Welcome to ChessVis 1.4
Chessvis.com User's Manual
The Mate and Tactics information is being updated -- Dec 6, 2017
As of March 19, 2017
Welcome to Chessvis.com. While the website is designed for exploration without prior
instruction, you will find that this document gives you an idea of what visualization exercises exist
and how to use them.
At present the website consists of three distinct visualization approaches.
- Static Boards - Look at a board, memorize it and rebuild it relying only on the image in your mind.
- Move Following - All exercises involve being given a board and a set of moves.
You need to visualize the effect of those moves on the board position. (And in the case of "Who's Guarding Whom", how
the movements impact the relationships of those pieces to each other.
- Tactics & Mates - Solve 1 to 3 move tactics and 1 to 4 move mates interactively. With the "Back it up" exercise, you solve the same tactics and mates but
the board position you see on the screen is from some number of moves before the tactic or mate sequence starts. You're told the moves and then need to solve the tactic or mate in your mind.
Before I continue, I beg your indulgence in the decidedly "Web 1.0" look of the site. This is the work
of one person. While I've been told I'm extremely good at what I do, one of the things
I don't do is "user interface" design. I'm all ears to your thoughts and suggestions. And if the website
ever makes a few bucks, I'll probably find a chess guy who likes "UI stuff" to help me. On the other
hand, chess is a game that has been played for 500 years on 64 squares with 32 pieces of wood. And when a piece
gets captured there's no explosions, no screams and no blood. So who knows, maybe my user interface
work will be just right. (Though I doubt it.)
Static Boards
It is said that looking at the board while trying to work out a move sequence is more of a hinderance than a help.
That the board hides the ranks, files and diagonals that get opened up and closed down by piece movements.
If you can hold the board in your head then it is easy to shift the pieces around and visualize the new board just as easily as the current board.
This isn't an easy task but the "Static Board" webpages will help you build up your visualization talent.
Start with a few pieces in a small part of the board and increase the number of pieces and space they use. The screens are:
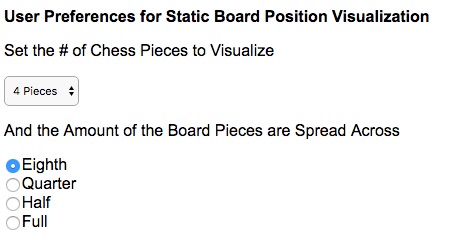
Static Options
Memorizing a board layout isn't easy (at least to me). There are options to limit the number of pieces and how
much of the board they occupy. In this example, there will only be 4 pieces on the board and they will occupy only an eighth of the board space.
Try a Static Board
A static board will be shown using the number of pieces and area of the board you specified in the options.
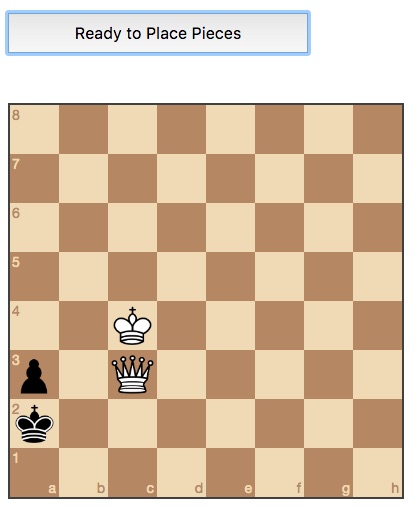
When you feel you have the board memorized, click the "Ready to Place Pieces" button and the display will change to:
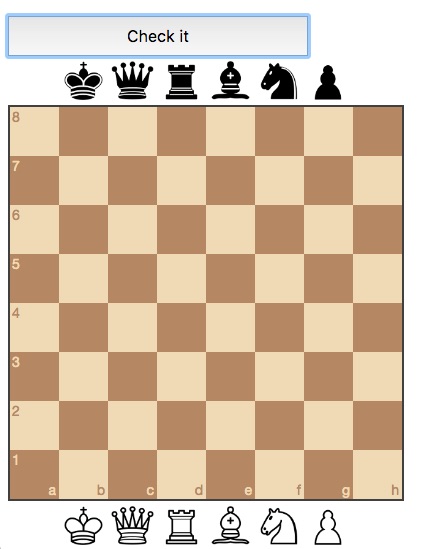
Drag and drop the piece inventory on the side of the board to replicate the board that was there before. When you are done, click "Check It" and the website
will check your work against the original.
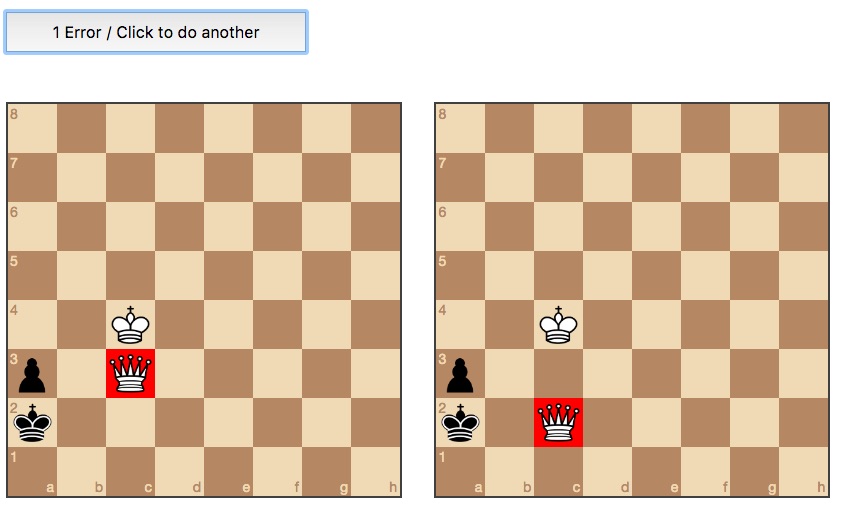
Here I placed the white queen in the wrong place and that error was highlighted.
Your attempt on the right and the correct answer on the left. Differences are
highlighed in red.
Evaluation Test
The website can test your memorization skill automatically. First phase is to determine how many pieces you can memorize. It will start with 16 pieces and then go up or down depending on how well you do. Once you are
100% successful on a set of pieces, it will repeat that for up to 5 times to determine an average. If you get them all right it will check the number level up and if you miss some it will check the next level down.
Move Following
The exercises in this area involve following a sequence of moves in your mind.
Several approaches are covered including working with a limited number of pieces,
work through an entire game a few moves at a time, focusing on a specific set of pieces and
lastly, maintaining a visual sense has to how pieces interact. The screens are:
- Move Options - Set the options for move following
- Move Set - Follow a set of moves from a real game.
The initial position will match the number of pieces you have specified in the options
- Entire Game - Start from the beginning move of a real game and follow it as far
as you can
- Specific Piece Options - Define the specific pieces you want to
work with
- Specific Pieces - Follow a random set of moves involving just
the specified pieces
- Who's Guarding Whom - Visualization technique where you
mentally track how 4 pieces interact with each other as moves are made. (Recommended in
an Andrew Soltis book.)
Move Options
For Move Set, Entire Game and Specific Pieces, you will be shown a board position and then
a set of moves. After the moves, you will be asked to update the board to reflect how the board
will look at that new point. These options allow you to control the difficulty.
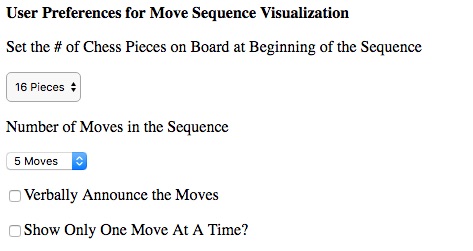
- Set the # of Chess Pieces... - this option is used for the Move Set exercise.
Chessvis will find a game position that has this number of pieces in it for you to track.
- Number of Moves in the Sequence - How many moves are shown before you are asked to update
the board. (This is the number of white & black move pairs.) The fewer moves in the sequence,
the easier the task.
- Verbally Announce the Moves - If checked, the moves will be verbally announced. For example,
a woman's voice will say: Bishop takes E 6", in addition to displaying the move on the screen.
The idea here is that you might find that your mind likes to receive information audibly and is able to maintain
the board image more easily this way.
- Show Only One Move at a Time - By default, all the moves for the sequence will be displayed
at once on the screen. This option will cause the exercise to only display one move at a time
and then that text will no longer be available for you to see and refer to.
Move Set
This exercise is designed for you to work on playing a set of given moves in your mind.
After the specific number of moves is made, your task will be updating the board to reflect the moves that have
been made. Here is a typical example when the
options are set to: 8 pieces, 3 moves and show all moves at once.
This position and the moves were retrieved from a real game.
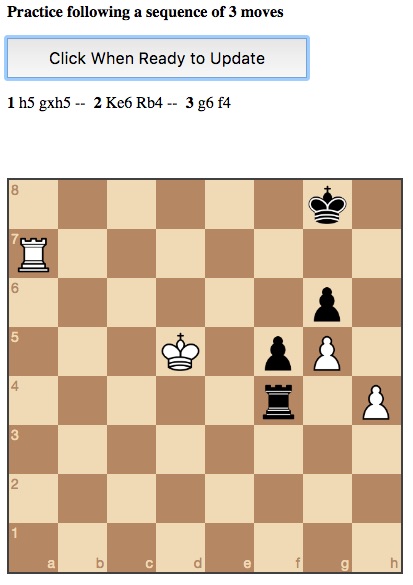
Now your task is to play the moves only in your mind and remember the final position.
When you are ready, click the button and the screen will change to the following:
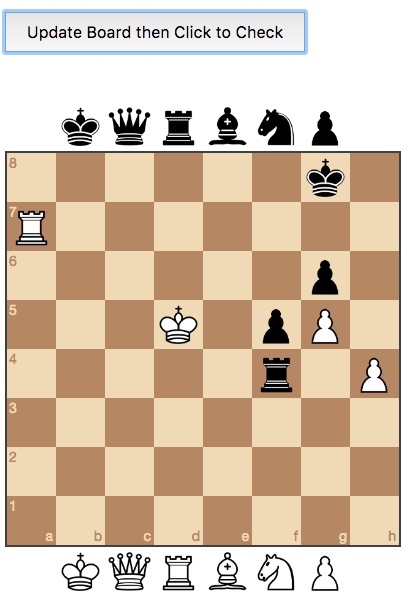
The board has now been unlocked. Move the pieces to where they should be as though all the moves
in the sequence have been played. If a piece is gone, drag it off the board. If a pawn is promoted, then
grab it from the inventory above or below the board. Once you have updated the board,
click the update button and your work will be checked. (For this User Manual example, the white King was
moved to "e5" and not the correct "e6".)

This two board layout shows your work on the left and the correct layout on the right.
Errors are highlighted in red. (And in this case, the white king's correct and wrong location
are highlighted.)
Entire Game
The concept behind this exercise is the same as in Move Set except here we start
at the beginning of a game.
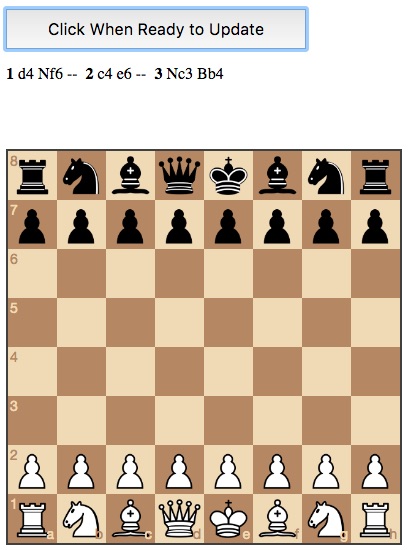
After every specified number of moves, you will update the board
and then can continue through the entire game if you so desire.
Specific Piece Options
If you want to focus on the movements of specific pieces, use this screen to indicate the
piece combination and use the next screen (Specific Pieces) to follow the move
sequence involving those pieces. The only limitations are that there have to be at least
two pieces of each color and at most 8 pieces of any given color. In other words, if you wanted
to focus on knight movements, you could have 4 knights of each color or even 8!
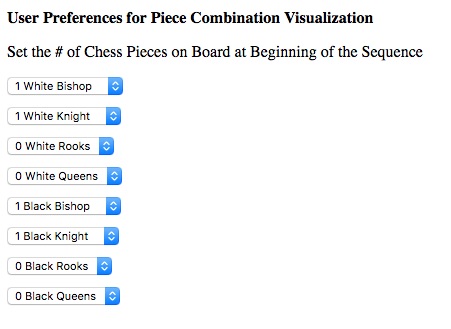
In the above example, a white knight, white
bishop, black knight and black bishop will be randomly moved.
Specific Pieces
A board and random piece movements will follow the piece counts given on the Options screen.
Your interaction with the screen is the same as with the previous example given for Move Set.
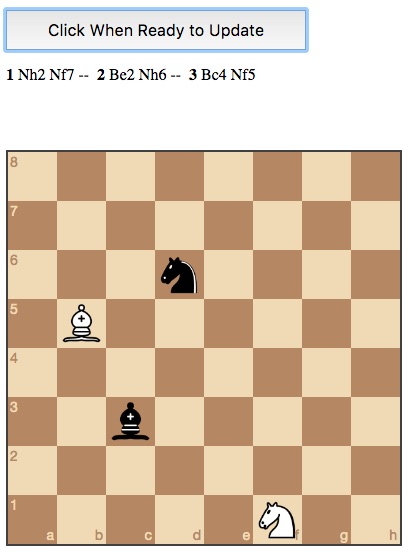
One thing to note is that for each unique combination of pieces, multiple long games are created for those
pieces. If the combination hasn't been created before then there will be a slight delay while those
games are created. This is mentioned on the screen before your first board is displayed.
Who's Guarding Whom
In Andrew Soltis' Book, Studying Chess Made Easy, he references an
exercise cited by the Russian educator Alexey Bartashnikov in 64 magazine.
Dan Heisman also mentions this exercise in his Novice Nook column on Improving Visualization.
In summary, the exercise consists of a board with a random setup of a white queen, rook, knight and bishop.
Moves are given and after each move, you must determine how the pieces "guard" each other.
Any number of sequential moves can be done but the visible board is never updated beyond the initial display.
For example,
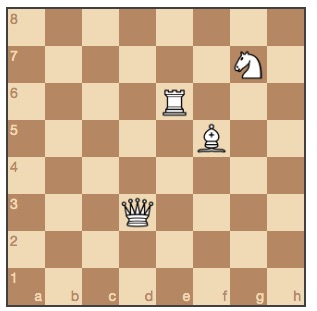
Then your task is identifying which pieces are "guarding" another piece.
For example, in the above board the knight is "guarding" both the rook and the bishop.
Identify all the guarding using the set of checkboxes to the right of the board.
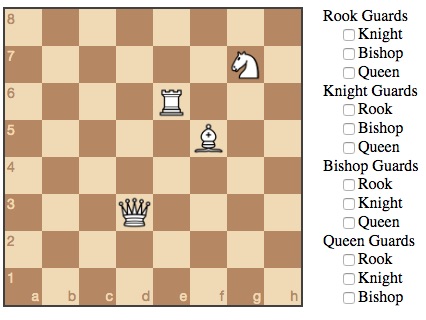
For this board, here is how the checkbox array should look.
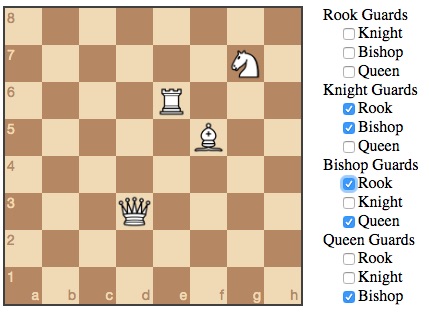
Once you have checked all the boxes, click the button

and Chessvis will verify your work. In this case, there are no errors.
Now the fun begins, clicking the button will show you the first move you need to track
solely in your mind.

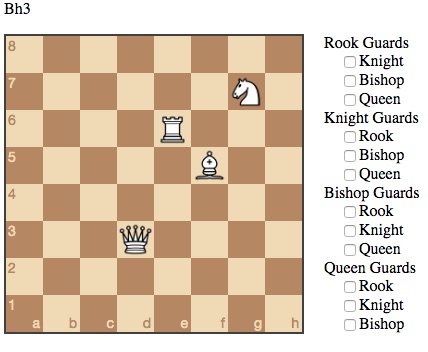
The Bishop moves to "h3" and that changes the dynamic of who is guarding whom.
See the Bishop on h3 in your mind and see how it is interacts with the other pieces. Check the boxes accordingly.
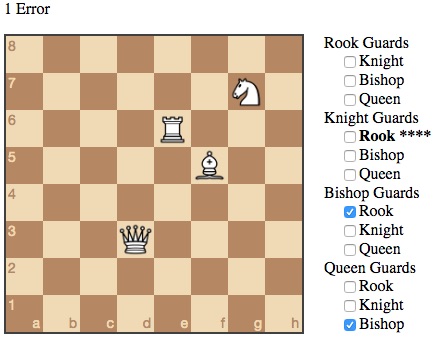
Here, a guarding is purposely missed and the system highlights the error.
Now it is time for move 2 which builds on move 1. There is no limit on how many sequential moves
you can try. When you're done, click "Done" and you'll be told the number of total errors and time spent.
Welcome to the tactic and mate puzzle solving exercises.
You can interactively solve 1 to 3 move tactics and 1 to 4 move mate sequences. "With the "Back it up" exercise, you solve the same tactics and mates but
the board position you see on the screen is from some number of moves before the mate sequence starts.
You're told the moves but need to visualize them before solving the tactic or mate in your mind.
The screens are:
- Tactic Options - Set the options for tactics
- tactics - Interactively solve 1 to 3 move tactics.
- Back It Up - tactics - The same set of tactics is used but the board position you see on the screen is from some number of moves before the tactic sequence starts.
You are told the "backed up" moves and will need to visualize them in your mind before solving the tactic.
- Mate Options - Set the options for mates
- Mates - Interactively solve 1 to 4 move mates.
- Back It Up - Mates - The same set of mates is used but the board position you see on the screen is from some number of moves before the mate sequence starts.
You are told the "backed up" moves and will need to visualize them in your mind before solving the mate.
Tactic Options
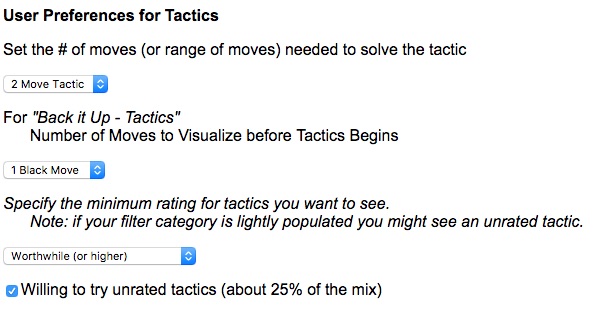
You have the option of specifying how many moves are in the tactic sequence.
Obviously, the more moves, the more difficult the sequence is to figure out.
For Back it up, you specify how many moves you will need to visualize before solving the tactic.
This can range from just one move for black up to 10 full moves.
Some of the tactics problems are better examples than others so you can specify the quality of the tactics you want to see.
There is also a checkbox
for you to see unrated tactics about 25% of the time. Volunteering would be helpful and please rate the tactics as you experience them. (Please login to vote.)
Tactics
This exercise enables you work on your tactic solving ability.
Note: for the purposes of this website, a tactic is a problem that ends when either a black piece (other than a pawn) is captured without a recapture
or an exchange of a white piece for a higher value black piece. The objective is material superiority in the number of moves specified and not other possibilities
that generate a result in a different number of moves.)
After clicking on "Get Tactic", you will be shown a board meeting the criteria specified on the "Tactic Options" page.
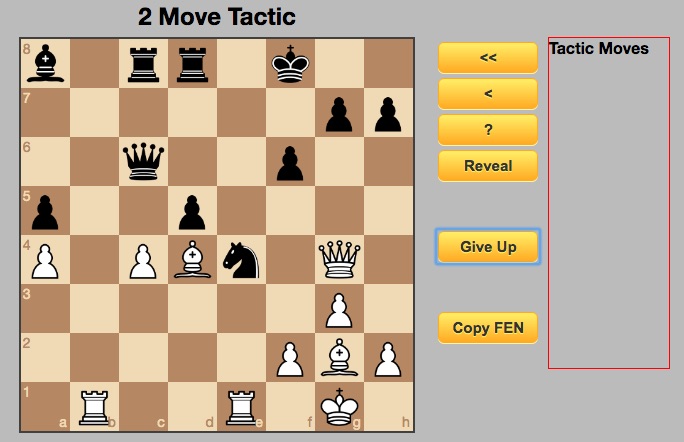
You directly manipulate the pieces on the board to solve the tactic problem. For example, if you feel the first move
of the sequence is that the pawn on "c4" needs to take the pawn on "d5" then click on the pawn and drag it to that square.
Since that is a good first move in the sequence,
the move will be noted on the right side and black will make a move and the board will be ready for your next move.
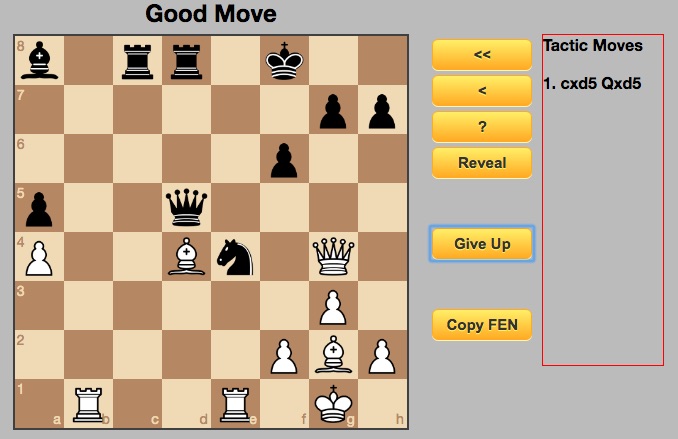
Now the board is ready for your second move. As before, if you feel the rook should move to the "e4" square, pick it up and move it.
Since this is the right second move in the two move tactic sequence, you have solved the tactic successfully.
(The sequence is over because white is a knight ahead.)
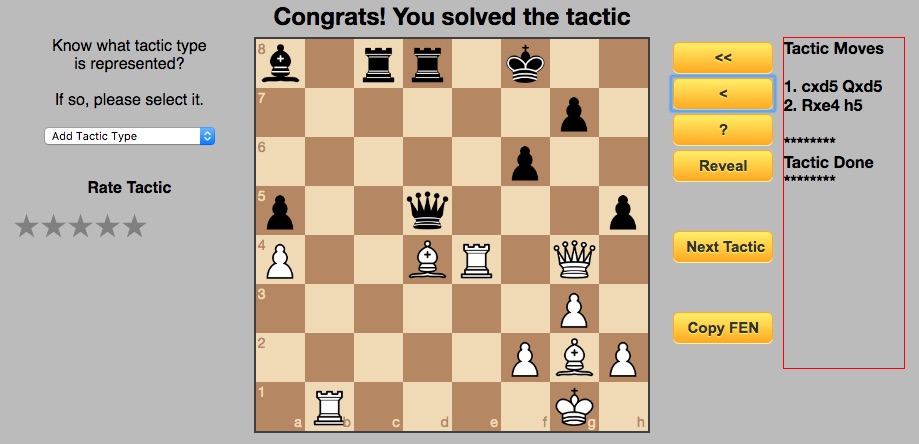
These option buttons are available to the right of the board:
- Double right arrow -- restart the tactic attempt
- Single right arrow -- undo the last move. (If you made a wrong more, you will be asked to undo it before trying again.)
- Question mark -- briefly shows you a valid next move. (I say "valid" because for some tactics there are multiple valid moves.)
- Reveal -- Shows the entire tactic sequence and ends this puzzle attempt. (You can click this button multiple times if it went by too fast.)
- Copy FEN -- Copy the board description to the clipboard. Sometimes, the reason a tactic works is mysterious and the best way to clarify the
reason is to bring the board layout into an analysis program that has a "Paste FEN" option.
"Stockfish" is an excellent free program for this purpose. FYI, FEN is used by computer programs to describe the position of the pieces on the board.
If you have registered and logged-in (which we recommend), you can specify which motifs you feel are shown in the tactics problem.
(After there are a sufficient number of problems with identified motifs, we will add tactic type filtering as an option so you can practice
a specific set of tactical motifs.)
In this example, I felt the black pawn was guarding the knight and the first move "removed the guard". Then the knight can be won because of superior force on that square.
I also felt this was an excellent representation of these tactical motifs and that other users would benefit from seeing it.
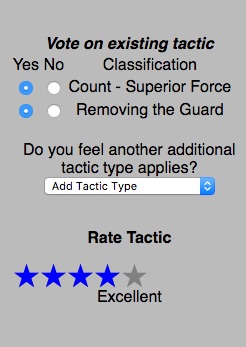
If others have voted on the tactic, you will see all the motifs picked and you can either agree (yes) or disagree (no).
A description of the tactical motifs can be found at the end of this document.
Back it Up - Tactics
Here again your task is to figure out the tactics sequence but this time with a "twist".
The tactic is there but the board position has been "backed up" some number of moves.
(The number of moves is specified in the tactics options and can range from just one move for black up to 10 full moves.)
The moves you need to visualize before you can solve the tactic are given on the left side.
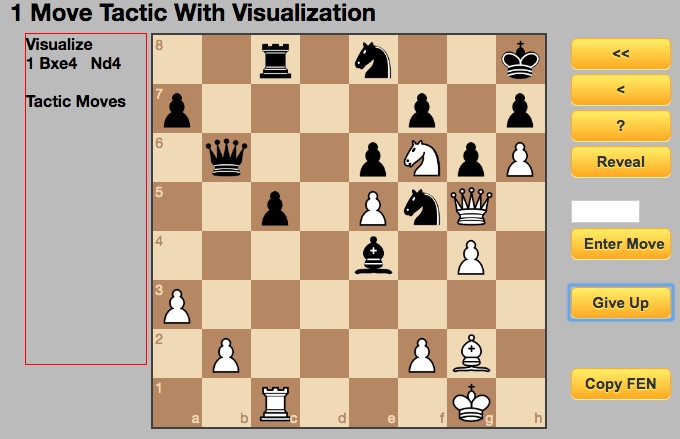
In this example, the 1 move tactic is preceeded by white moving the bishop and capture what was on "e4" and
black responding by moving their knight to "d4".
Visualize those moves and determine the right next move for white.
Since the board is not like what you need it to be to directly manipulate the pieces,
you will have to enter the move text in the box and click "Enter Move".
Did you come up with "Nxe8" as the right next move? (Black can't take back because of the mate threat by the white queen
moving to "f6". (Here I was curious what black's response should be so I copied the FEN and pasted it into Stockfish which told me
that black needs to move the queen to "d8" to cover the "f6" square.)
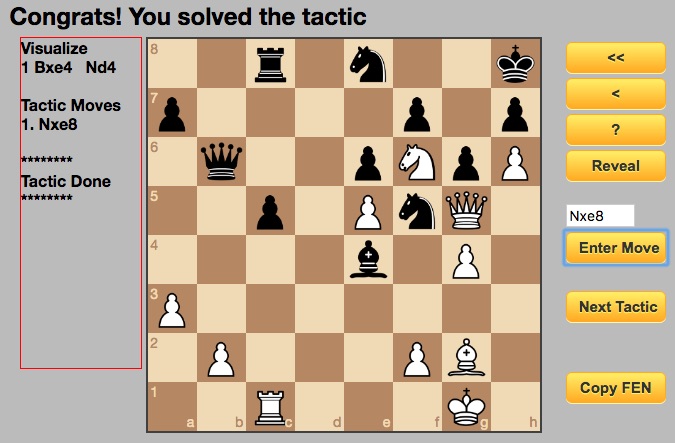
As with the regular tactics puzzles, the buttons do the same thing. The "Reveal" button will show
both the visualized moves and the mate sequence moves. Also, if you have logged-in, you will have an opportunity to
rate and assign tacitcal motifs.
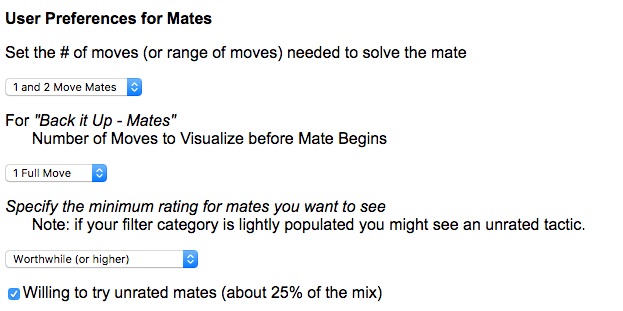
Mate Options
You have the option of specifying how many moves are in the mate sequence.
Obviously, the more moves, the more difficult the sequence is to figure out. You can specify an exact number or a range.
For Back it up, you specify how many moves you will need to visualize before solving the mate. This can range from just one move for black up to 10 full moves.
Some of the mate problems are good examples and you can specify the quality of the mates you want to see. There is also a checkbox
for you to see unrated mates about 25% of the time.
Volunteering would be helpful and please rate the mates as you experience them. (Note: you need to login to vote.)
Mates
This exercise enables you work on your mate solving ability.
After clicking on "Get Mate", you will be shown a board where there is a mate sequence for white.
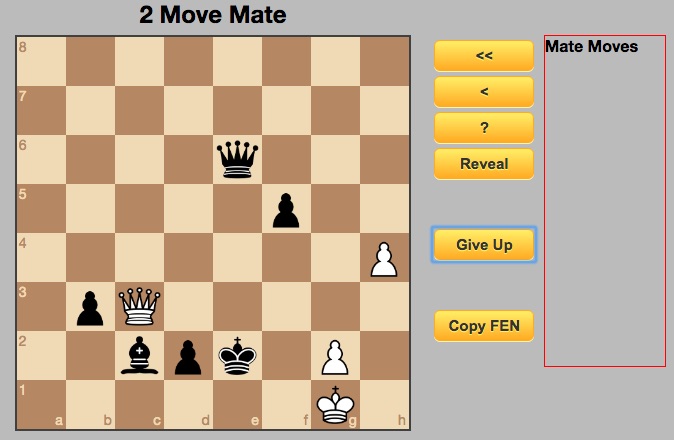
You directly manipulate the pieces on the board to solve the mate. For example, if you feel the first move
of the sequence is that the queen needs to go to "f3" then click on the queen and drag it to that square. Since that is a good first move in the sequence,
the move will be noted on the right side and black will made a move. The board will be ready for your next move.
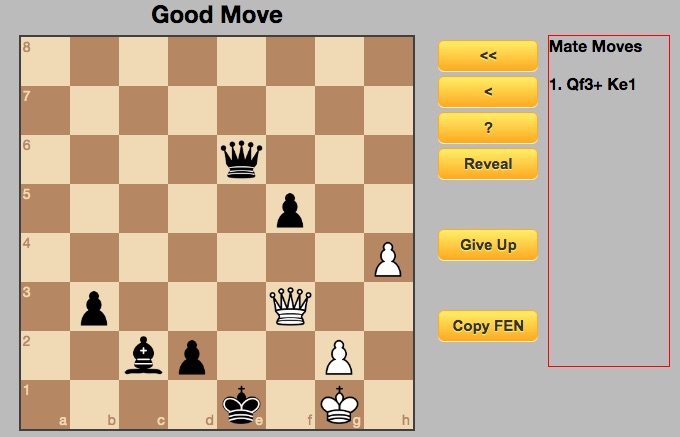
Now the board is ready for your second move. As before, if you feel the queen should move to the "f1" square, pick it up and move it.
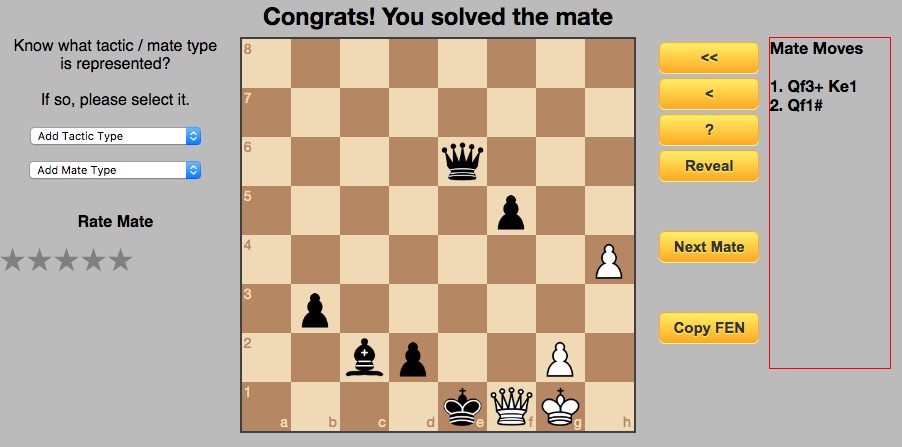
Since this is the right second move in a two move mate sequence, you have now solved the mate successfully.
There are option buttons available:
- Double right arrow -- restart the mate attempt
- Single right arrow -- undo the last move. (If you made a wrong more, you will be asked to undo it before trying again.)
- Question mark -- briefly shows you a valid next move. (I say "valid" because for some mates there are multiple valid moves.)
- Reveal -- Shows the entire mate sequence and ends this puzzle attempt. (You can click this button multiple times if it went by too fast.)
- Copy FEN -- Copy the board description to the clipboard. Sometimes, the reason a mate works is mysterious and the best way to clearify the reason is to bring the board layout into an analysis program that has a "Paste FEN" option.
"Stockfish" is an excellent free program for this purpose. FYI, FEN is used by computer programs to describe the position of the pieces on the board.
If you have registered and logged-in (which we recommend), you can specify which tactical motifs and which mate name you feel are shown in the problem.
(After there are a sufficient number of identified motifs, we will add tactic type filtering as an option so you can practice
a specific set of tactical motifs.)
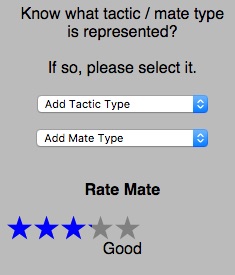
In this example, I didn't feel it met any tactical motif. I also didn't know a mate type that fit. I didn't select either.
But I did feel it was a good 2 move mate so I rated it accordingly.
If others have voted on the tactic and/or mate, you will see all the motifs picked and you can either agree (yes) or disagree (no).
A description of the tactical motifs can be found at the end of this document.
A very good description of mates can be found at this Wikipedia page -- https://en.wikipedia.org/wiki/Checkmate_pattern
Back it Up - Mates
Here again your task is to figure out the mating sequence but this time with a "twist".
The mate is there but the board position has been "backed up" some number of moves. (The number of moves is specified in the options and can range from just one move for black up to 10 full moves.)
The moves you need to visualize before you can solve the mate are given on the left side.
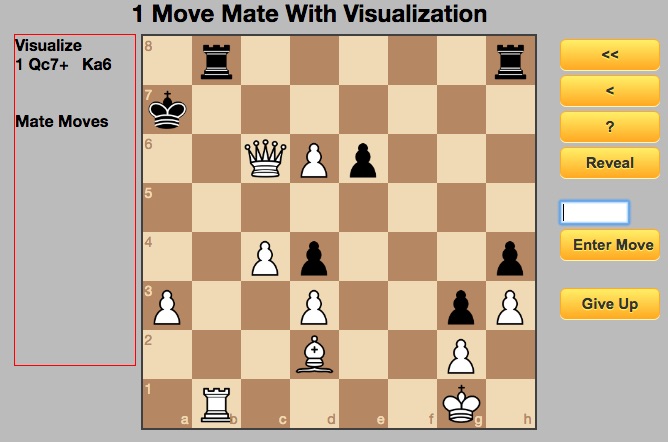
In this example, the 1 move mate is preceeded by white moving the queen to "c7" and black responding by moving their king to "a6". Visualize those moves and determine the right next move for white.
Since the board is not like what you need it to be to directly manipulate the pieces, you will have to enter the move text in the box and click "Enter Move".
Did you come up with "Qa5" as the right next move?
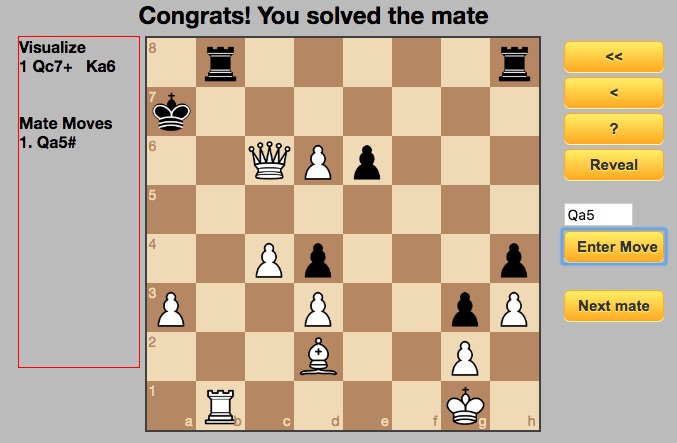
As with the regular mate puzzles, the buttons do the same thing. The "Reveal" button will show
both the visualized moves and the mate sequence moves.
Battery -- Multiple pieces lined up attacking the same square
Clearance Sacrifice -- Giving up material for the greater good
Count - Superior Force -- More attackers than defenders
Decoy -- forcing a piece to move to square
Deflection -- forcing a piece to leave a square
Discovered Attack -- Attack caused by one piece moving out of the way of another
Discovered Checks -- Check caused by one piece moving out of the way of another
Double Attacks by Pawn -- double attack when a pawn moves
Double Checks -- Check by two pieces at the same time
Fork - Bishop -- Bishop attacking two pieces at once
Fork - King -- King attacking two pieces at once
Fork - Knight -- Knight attacking two pieces at once
Fork - Pawn -- Pawn attacking two pieces at once
Fork - Rook -- Rook attacking two pieces at once
Fork - Queen -- Queen attacking two pieces at once
In-Between (Zwischenzug) -- Intermediate move. For example, moving an attacked queen by checking the king before capturing a piece
Interference -- Interposing a piece to break the line between an attacked piece and its defender
Loose Piece -- undefended piece for the taking
Mate Threat -- black's action is control by having to defend against a mate threat
Opening and Closing Lines -- Moving a piece to either open a line of attack or close one for black
Perpetual Check -- drawing a lost game by forever checking
Pin - Absolute -- Pin against the king
Pin - Relative -- Pin against other pieces
Promotion -- the promotion of a pawn or threat of promotion
Removing the Guard -- capturing or forcing the movement of a piece that guards the one you capture
Sacrifice to Expose King -- sacrifice to open up the space around the king
Skewer -- Pin but the more valuable piece is the first one attacked
Stalemate -- the king has no safe squares and no other piece can move
Trapped Piece -- a piece that has no place to go without loss
Windmill -- discovered check used to capture material
X-Ray -- attack through another piece
More information can be found starting at this Wikipedia page -- https://en.wikipedia.org/wiki/Chess_tactic
Copyright 2021 - Conceptual Software, Inc.